Sehr schicke Aufbereitung zu dem Thema Outlook Sync / CRM 2011 Problemlösung von Carsten Groth:
Ihr habt den Outlook-Client neu konfigurieren müssen oder Ihr habt die Organisation mit der Outlook synchronisiert wird zwischendurch gewechselt und wieder zurückgestellt? Bei einem anschließenden Blick auf die Kontakte stellt Ihr fest, dass Ihr nach Synchronisation mit CRM diverse Dubletten im Outlook habt. Einige davon haben das CRM Kontakt Symbol, andere das CRM Symbol. Leider eignet sich dieses Symbol kaum zur Entscheidung, ob ein Kontakt gefahrenfrei gelöscht werden kann oder nicht, denn eigene Kontakte haben selbstverständlich auch das normale Outlook Kontaktsymbol.
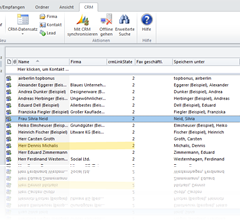
Glücklicherweise stellt uns Microsoft eine einfache Möglichkeit zur Verfügung in einem solchen Fall in den Outlook Kontakten aufräumen zu können. Ihr fügt der Ansicht die neue Ansichtsspalte crmLinkState hinzu. Der Datentyp ist Nummer.
In dieser Spalte seht Ihr jetzt entweder
| keinen Eintrag | Der Kontakt wird nicht mit CRM synchronisiert |
| 0 | Der Kontakt wurde schon einmal mit CRM synchronisiert |
| 2 | Der Kontakt wird aktuell mit CRM synchronisiert |
Aus der Praxis habe ich auch noch einen weiteren Tipp für Euch. Dieser bezieht sich auf eine Fehlkonfiguration der Outlook Synchronisationsfilter. Dies hängt damit zusammen, dass oftmals dem Nutzer die Kontrolle über die Synchronisation überlassen wird, was sicherlich nichts schlimmes an sich darstellt, jedoch das Verständnis auf Seiten der Nutzer für die unterschiedlichen Filterdefinitionen fehlt. Doch hierzu ein Beispiel:Aus dieser Konstellation ergibt sich, dass Ihr jene Kontakte mit einer “0” gefahrenlos als Dublette löschen könnt.

Ein Nutzer Fossi, Bär hat einen neuen Kontakt angelegt, der eine E-Mail Adresse endend auf @example.com enthält.

Für den Nutzer Vorname, Nachname existieren Outlooksynchronisierungsfilter. Einer davon sammelt alle Kontakte, deren E-Mail Adresse auf @example.com endet. Dieser Filter ist aktiv.

Doch für den User oftmals verwirrend, gibt es auch in den Offlinesynchronisierungsfiltern einen solchen Eintrag, dieser ist in meinem Beispiel deaktiviert worden.
Viele sind sich der Bedeutung und dem Unterschied dieser beider Filtergruppen nicht bewusst und kennen die Auswirkungen nicht.

In meinem Beispiel synchronisiert Vorname, Nachname seine Daten mit dem CRM und findet in seiner Kontaktliste fortan den neuen Kontakt Dennis Michalis.
E-Mails nachverfolgen und versenden funktionieren einwandfrei und es kommt der Tag, da Vorname, Nachname offline geht.

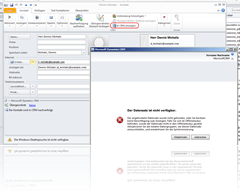
In den Outlook Kontakten bleibt der Kontakt dabei weiterhin erhalten, jedoch bei einem Klick auf In CRM anzeigen wird eine Fehlermeldung angezeigt.
Viele vermuten jetzt irgendwelche Rechterollenprobleme. In Wahrheit aber, ist der deaktivierte Offlinesynchronisierungsfilter hierfür verantwortlich.

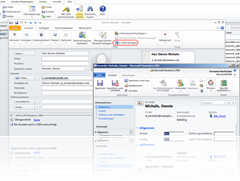
Denn kaum haben wir diesen wieder aktiviert, sind erneut offline gegangen und betätigen erneut die Schaltfläche In CRM anzeigen, zeigt sich der Datensatz auch im Offline-Modus.
Des Weiteren unterschätzen viele, dass die Regeln jeweils kumulativ arbeiten.
Wenn also eine Regel nur aktive Kontakte anzeigt, ich in einem anderen Kontaktfilter jedoch auf die Statusabfrage verzichtet habe, dann können deaktivierte Kontaktdatensätze weiterhin in den Outlook Kontakten angezeigt und synchronisiert werden.
Daher ist es ratsam, die einzelnen Filter genau zu definieren, damit auch nur diejenigen Datensätze rückgeliefert werden, die auch tatsächlich synchronisiert oder angezeigt werden sollen.
Weitere Informationen zum Thema:
================================
Getting CRM Data into Outlook
One of the first questions people ask when they begin using the Microsoft Dynamics CRM 2011 Outlook Client is “how can I control what CRM data appears in Outlook”? Syncing too much data can reduce performance, but you also want to have information at your fingertips when you need it.In Microsoft Dynamics CRM 2011, the Outlook Data Filters feature allows users to take control of what CRM data appears in Outlook. In CRM 4, users had the ability to specify what data they wanted to take Offline (i.e. when they weren’t connected to CRM), and in CRM 2011 we’ve expanded this feature to also allow users to specifically control what data syncs to Outlook’s own folders, like the Calendar and the Tasks pane.
This blog post explains what the filters are and how to use them effectively. You should read it if you would like to see additional CRM data in Outlook or Offline mode, or conversely, if sync is taking longer than you’d like.
Warning: With great power comes great responsibility. If you run into any issues, follow the instructions in the “Resetting your Filters” section to reset your filters to your organization’s standard settings.
The Filters Dialog
The filters dialog can be accessed in Outlook 2003 and 2007 by navigating to CRM->Outlook Filters, and in Office 2010 by going to the File backstage menu, then clicking CRM, pressing the ‘Sync’ button dropdown and selecting the ‘Outlook Filters’ option.
 |  |
| Office 2003 & 2007 | Office 2010 |
After you open the filter dialog, you’ll see something like this:

You can see that the dialog contains a list of rows (these are the filters) for different Outlook entity types, such as Contact, Task and Appointment (note that email is synced with CRM differently and is not managed by this feature). There is also a dropdown which lets you change the view to show Offline Synchronization Filters … what are these? Time for some definitions:
Outlook Filters
| Outlook filters affect CRM items which have counterparts in Outlook, like Tasks, Contacts and Appointments. They control what data gets synced to Outlook folders, such as the Contacts folder or Calendar. |
Offline Filters
| Offline filters affect the CRM folders in Outlook, and they specify what data gets stored on your machine when you disconnect from the internet (a.k.a. “Go Offline”). If you’re always on the move and you find that you’re missing CRM data while Offline, you’ll want to modify your Offline filters. Alternatively, if you’re finding that going Offline is taking a long time, you can remove or deactivate some of your data filters to reduce the amount of data which needs to be synced. |
You also might be wondering what that ‘System Filters’ tab is referring to:
User Filters
| These filters belong to you, and they dictate what information gets synced down from CRM to Outlook. |
System Filters
| These filters are set by the system administrator, and they apply to everyone. |
Modifying a Filter
Filters work cumulatively – each filter defines a set of data which will sync to Outlook. For example, click on the ‘My Outlook Contacts’ filter and a new dialog will come up showing the filtering conditions for this filter. You can see that we’ve specified that any Contact which is owned by us and which is set to be Active will be synced to our Contacts folder.

Now, let’s say that we didn’t want all of our CRM contacts to appear in Outlook, but only the Contacts from our hypothetical partner firm, Contoso. We’d add another clause to the filter condition as follows:

After adding this condition, we can Save and then close the dialogs – next time you sync with CRM, all CRM Contacts (including Outlook contacts which you’ve tracked) will disappear from your Contacts folder unless they belong to Contoso.
Creating a new Filter
So modifying filters is easy enough, but what about adding new ones? As we said, filters are cumulative, so if you create multiple filters for a single entity type, then entities which match any of the filters will be synced.
By default, Outlook will only take the accounts you own Offline, even if you have access to other accounts. Let’s run through creating a simple filter that will make sure that all accounts which were modified in the last week are synced Offline. We’ll leave the existing filter in place as well so that you’ll still get all of your personal accounts, even if they haven’t been changed recently.
To start with, choose “Offline Synchronization Filters” from the dropdown and then click “New”.

You’ll see a new filter dialog come up. Account should be selected as the default entity, but you can pick another entity type from the dropdown if you wish:

Then we can go on to define some conditions for our filter, namely that the “Modified On” date should be within the “Last 7 Days”.

We can then save the filter, which prompts us to choose a name.

Once you’re done, hit “OK” and close the filter dialog and you should see your new filter in the list!
Resetting your Filters
What if you’ve blundered somehow, and messed up your filter settings? You can go back to the way things were by opening the filters dialog again and clicking More Actions -> Reset Data Filters. This will restore your filters to the default filter set for the organization.
The downside of this is that you’ll lose all of your new filters and modifications, but that’s the point of reset, right?
But wait… there’s more
We’ve covered some basic scenarios which leverage the Outlook Data Filters feature, but there’s plenty of extended functionality. Most of the latter is targeted more towards ‘power users’, so in general, we recommend keeping things simple.
If you have any questions, feel free to post a comment or create a thread on the forums. Technical details about filters can be found in this MSDN article.

 08:40
08:40
 Dynamics Consulting München
 Posted in:


